Notice
This documentation is only for public app authentication, for private app authentication, please refer to Access Token.
The OAuth Process Overview
Public apps must authenticate using OAuth 2.0 to use Shoplazza's API resources.
Shoplazza uses OAuth 2.0’s authorization code grant flow to issue access tokens on behalf of users, OAuth 2.0 is the industry-standard protocol for authorizing or giving permissions to apps. The OAuth flow is used so that merchants can authorize Shoplazza apps to access data in a store. For example, an app might be authorized to access orders and product data in a store.
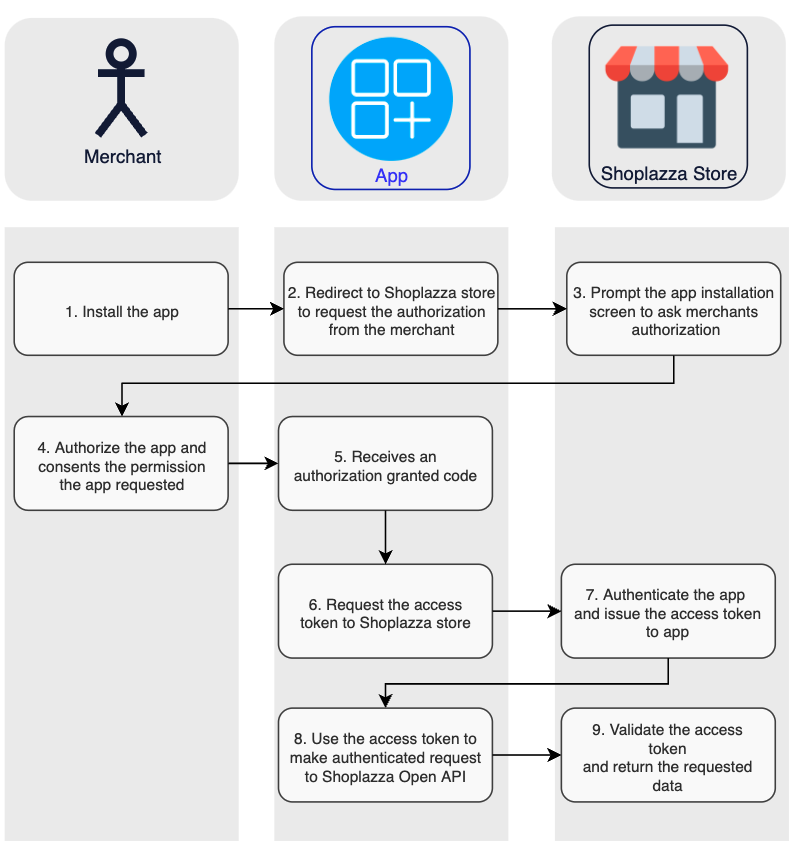
The following diagram illustrates the OAuth flow based on the actions of the merchant, your app, and Shoplazza:

- The merchant makes a request to install the app.
- The app redirects to Shoplazza Store's app installation page to requests the merchant to authorize.
- Shoplazza store's app installation page prompt the OAuth grant screen and requests the merchant to authorize the required scopes.
- The merchant authorizes the app by consenting to the permissions app requested.
- The app receives an authorization granted code.
- The app requests an access token by send request to Shoplazza Store with the authorization granted code.
- Shoplazza authenticates the app, validates the authorization granted code, and then issues and returns an access token. The app can now request data from Shoplazza.
- The app uses the access token to make requests to the Shoplazza Open API.
- Shoplazza validates the access token and returns the requested data.
The Steps of the OAuth Process

OAuth SDK Available!
You can use SHOPLAZZA OAuth SDKs to quickly complete the step 2(aka OAuth process), go and checkout our OAuth SDK SHOPLAZZA OAuth SDKs to learn more, also checkout the sub-steps below, SDK tips will be shown in every sub-steps!
Step 1: Obtain the Client ID & Client Secret
To obtain the Client ID & Client Secret, you need to
- Create an public app, refer to Create an app
- After your app is created, go to app settings page, scroll to App credentials to obtain your Client ID & Client Secret.
Step 2: Ask for permissions
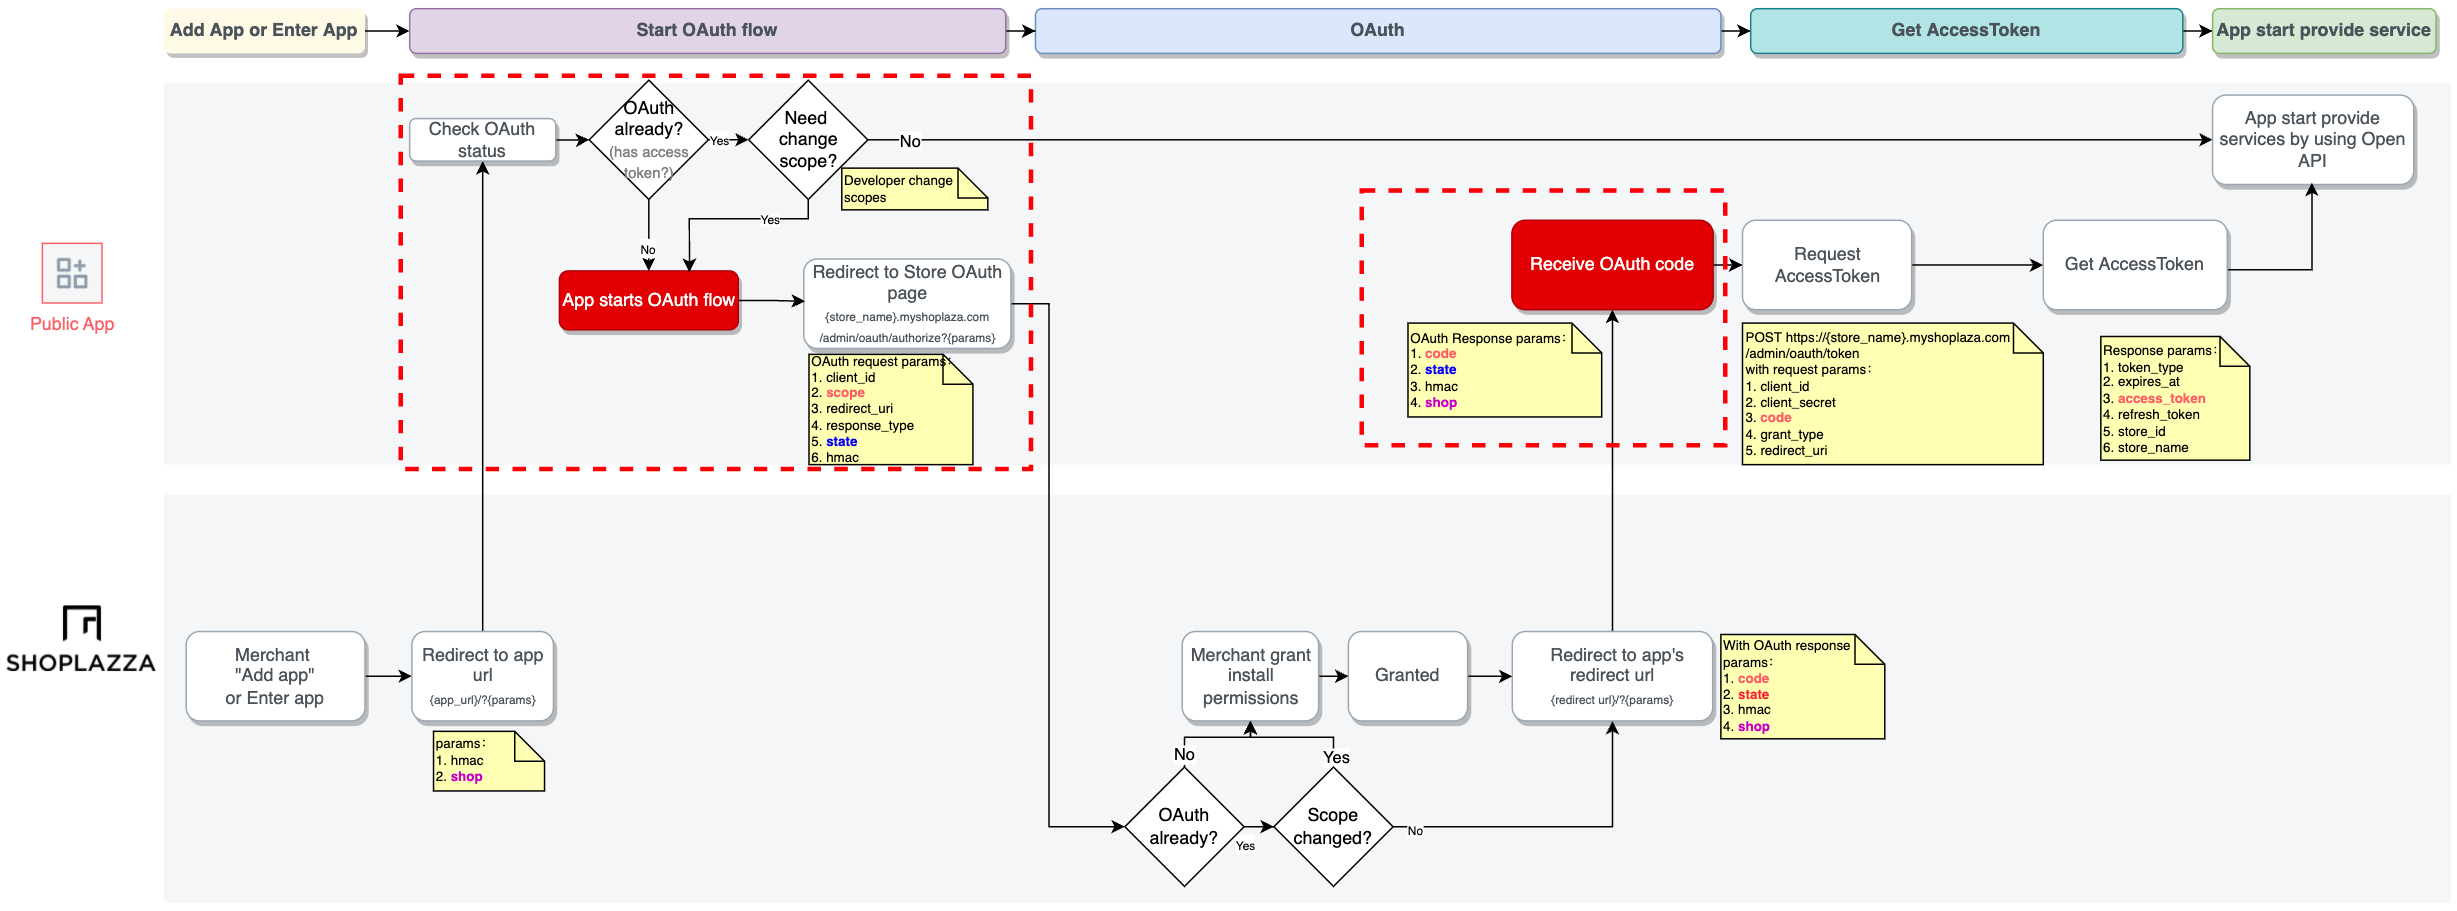
Before an app can access any store data, a merchant must grant permission to the app. Granting permission happens when a merchant clicks the link to install your app.
After a merchant clicks "Add app" on Shoplazza App Store to install your app, your app will receive a GET request to the App URL path that you specified when you created an public app in partner dashboard.
Requests to this URL from a Shoplazza Store include the shop, timestamp, and hmac query parameters.
Notice
If your install link doesn’t originate from the Shoplazza App Store, then you need to provide the shop parameter yourself or use another method to get the merchant's shop. For example, you could supply a text field where the merchant enters their store name.
You need to verify the authenticity of these requests using the provided HMAC. For more information, refer to Verify a request.
To show the installation permissions prompt, redirect the merchant to the following URL with the query parameters defined below:
https://{store_name}.myshoplaza.com/admin/oauth/authorize?client_id={client_id}&scope={scopes}&redirect_uri={redirect_uri}&response_type={response_type}&state={state}
| Query parameter | Description |
|---|---|
| store_name | The name of merchant's store. |
| client_id | The Client ID for the app. |
| scope | A space separated list of scopes. For example, to write orders and read customers, use scope=write_order read_customer. |
| redirect_uri | The URL to which a merchant is redirected after authorizing the app. The complete URL specified here is what the App Redirect URL you specified when you create an public app. |
| response_type | The response type of OAuth 2.0 process, here we need to fill in code |
| state | A randomly selected value provided by your app that is unique for each authorization request. During the OAuth callback, your app must check that this value matches the one you provided during authorization. This mechanism is important for the security of your app. |
Step 3. Confirm Installation
When the merchant clicks the install button in the prompt, they’re redirected to your app's redirect_uri. The authorization_code is passed in the confirmation redirect:
http://example.com/some/redirect_uri?code={authorization_code}&shop={store_name}.myshoplaza.com&hmac={hmac}&state={state}
Security Checks
Before you continue, make sure that your app performs the following security checks. If any of the checks fail, then your app must reject the request with an error, and must not continue.
- The
stateis the same one that your app provided to Shoplazza during there - The
hmacis valid and signed by Shoplazza - The
shopparameter is a valid shop hostname, ends withmyshoplazza.com, and doesn't contain characters other than letters (a-z), numbers (0-9), periods, and hyphens.
You can use a regular expression to confirm that the hostname is valid. In the following example, the regular expression matches the hostname form ofhttps://exampleshop.myshoplaza.com/:
/^(https)\:\/\/[a-zA-Z0-9][a-zA-Z0-9\-]*\.myshoplaza\.com\//
Step 4. Get a permanent access token
If all security checks pass, then you can exchange the authorization_code for a permanent access token by sending a request to the shop’s access_token endpoint:
POST https://{store_name}.myshoplaza.com/admin/oauth/token
In this request, store_name is the name of the merchant's store and alongs with the following parameters must be provided in the request body:
| Parameter | Description |
|---|---|
| client_id | The Client ID for the app, as shown in the Partner Dashboard when you create your public app |
| client_secret | The Client secret key for the app, , as shown in the Partner Dashboard when you create your public app |
| code | The authorization_code provided in the redirect |
| grant_type | The grant type of OAuth 2.0 process, please fill in authorization_code here. |
| redirect_uri | The redirect_uri of the app. |
The server responds with an access token:
{
  "token_type": "Bearer",
  "expires_at": 1550546245,
  "access_token": "eyJ0eXAiOiJKV1QiLCJh",
  "refresh_token": "def502003d28ba08a964e",
  "store_id": "2",
  "store_name": "xiong1889"
}
| Parameter | Description |
|---|---|
| token_type | It will just return Bearer. |
| expires_at | The access_token expired time, in timestamp. |
| access_token | The correct access_token. |
| refresh_token | The refresh token used to refresh the access_token if needed. |
| store_id | Store's ID in Shoplazza. |
| store_name | Store name. |
Refresh the access token
After access_token expired, The app need to call following endpoint to retrieve a new access_token and a new refresh_token ( Please save it into your app and you are gonna need it later)
POST https://{store_name}.myshoplaza.com/admin/oauth/token
In this request, following parameters are needed:
- client_id: The Client ID that Shoplazza provided.
- client_secret: The Client secret key that Shoplazza provided.
- refresh_token: The
refresh_tokenthat mentioned above. - grant_type: The grant type of OAuth 2.0 process, please fill in
refresh_tokenhere. - redirect_uri: The
redirect_uriof the app.
The server responds with an access token:
{
  "token_type": "Bearer",
  "expires_at": 1550546245,
  "access_token": "eyJ0eXAiOiJKV1QiLCJh",
  "refresh_token": "def502003d28ba08a964e",
  "store_id": "2",
  "store_name": "xiong1889"
}
Step 5: Make authenticated requests
After your app has retrieved an API access_token, it can make authenticated request to Admin API.
These request are accompanied with a header Access-Token: {access_token} where {access_token} is replaced with the permanent token.
The following request show how to retrieve a list of products using the Admin API
curl -i -X GET \
     -H "Content-Type:application/json" \
     -H "Access-Token:B_x-_5aVeXNwI-4AB98s5xLIvgv0fNzGf_MuTpqtIBA" \
     'https://store.myshoplaza.com/openapi/2020-01/products'
Changing granted scopes
After the merchant has agreed to install your app, you might want to change the granted scopes. For example, you might want to request additional scopes if your integration requires access to other API endpoints.
To change scopes, redirect the merchant to the app authorization link and request authorization of new permissions just like step 2:
https://{store_name}.myshoplaza.com/admin/oauth/authorize?client_id={client_id}&scope={scopes}&redirect_uri={redirect_uri}&response_type={response_type}&state={state}
Hmac Validation
Every request or redirect from Shoplazza to your app's server includes an hmac parameter that can be used to verify the authenticity of Shoplazza. For each request, you must remove the hmac entry from the query string and process it through an HMAC-SHA256 hash function.
For example, for following request:
http://example.com/some/redirect/uri?code=1vtke5ljOOL2jPds6gM0TNCeYZDitYB&shop=simon.myshoplaza.com&hmac=22bad22eee1f92836f7773e87d973479
To remove the hmac, you can transform the query string to a map, remove the hmac key-value pair, and then lexicographically concatenate your map back to a query string. This leaves the remaining parameters from the example query string:
code=1vtke5ljOOL2jPds6gM0TNCeYZDitYB&shop=simon.myshoplaza.com
Process the hash function
After you remove hmac and reformat the query string, you can process the string through an HMAC-SHA256 hash function using the Client secret Shoplazza provided to your app. The message is authenticated if the generated hexdigest is equal to the value of the hmac parameer.
The following Ruby example show how to process the string through a hash function:
def verified_hmac?(hmac)
  sha256 = OpenSSL::Digest::SHA256.new
  query_string = "code=1vtke5ljOOL2jPds6gM0TNCeYZDitYB&shop=simon.myshoplaza.com"
  calculated_hmac = OpenSSL::HMAC.hexdigest(sha256, CLIENT_SECRET, query_string)
  ActiveSupport::SecurityUtils.secure_compare(calculated_hmac, hmac)
end
Verify a webhook
The HMAC verification process for OAuth is different from the process to verify webhooks.
Webhooks can be verified by calculating a digital signature. Each webhook request include a base64 encoded X-Shoplazza-Hmac-Sha256 header, which is generated using the app's Client Secret along with the data sent in the request.
To verify that the request came from Shoplazza, compute the HMAC digest according to the following algorithm and compare it to the value in the X-Shoplazza-Hmac-Sha256 header. If they match, then you can be sure that the webhook was sent from Shoplazza. As a best practice, the HMAC digest should be verified before the app responds to the webhook.
The following example use Ruby and Sinatra to verify a webhook request:
require 'rubygems'
require 'base64'
require 'openssl'
require 'sinatra'

# Shoplazza's Client Secret
SECRET = 'my_secret'

helpers do
  # Compare the computed HMAC digest based on the shared secret and the request contents to the reported HMAC in the headers
  def verify_webhook(data, hmac_header)
    calculated_hmac = Base64.strict_encode64(OpenSSL::HMAC.digest('sha256', SECRET, data))
    ActiveSupport::SecurityUtils.secure_compare(calculated_hmac, hmac_header)
  end
end

# Responds to the HTTP POST request
post '/' do
  request.body.rewind
  data = request.body.read
  verified = verify_webhook(data, env["X-Shoplazza-Hmac-Sha256"])

  puts "Webhook verified: #{verified}"
end
